Complete guide: Payroll module
First time using our Payroll module? Here is the complete guide for you, consists of several parts :
Payroll settings
Go to Payroll tab and click Settings

Payroll permissions has been moved into settings page under Manage Admins and company info has been moved to Company Settings.
General Payroll Settings
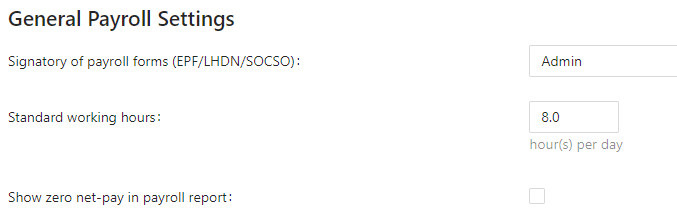
a) The first setting is to choose whose's name will appear in the payroll forms. Usually it would be the boss of a company.
b) Set the working hours in the company, usually it is 8 hours. This would impact pro-rata salary calculation and also OT calculation.
c) If "Show zero net-pay in payroll report" is turned on, employees who have RM0 for their basic salary will show appear inside payroll report as well.
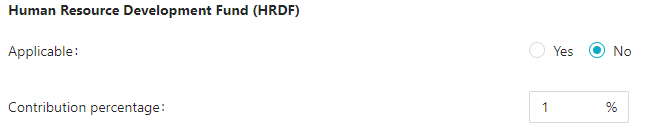
If HRDF is applicable to your company, turn it on here and key in the account number and percentage.

If ASNB is applicable to your company, turn it on here.
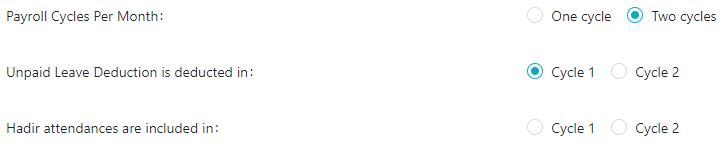
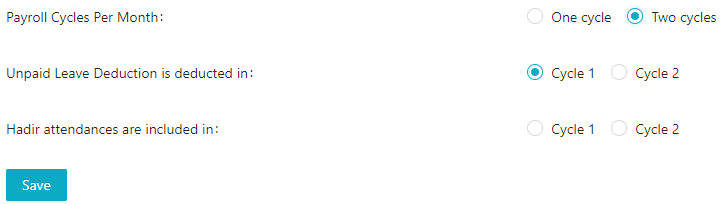
If your company runs on 2 payroll cycle, for example, cycle 1 is used to pay bonus/commission and cycle 2 is used to pay salary, select 2 cycles here.
a) If there is unpaid leaves deduction, you can choose for it to appear in cycle 1 or 2.
b) If hadir is linked to payroll, you can choose for the calculation to appear in cycle 1 or 2.

Our payroll is integrated with our claims and hadir modules! Feel free to link them to make it easier to process claims and hadir.
EPF

Here is where you can do some customization for EPF employer calculation.
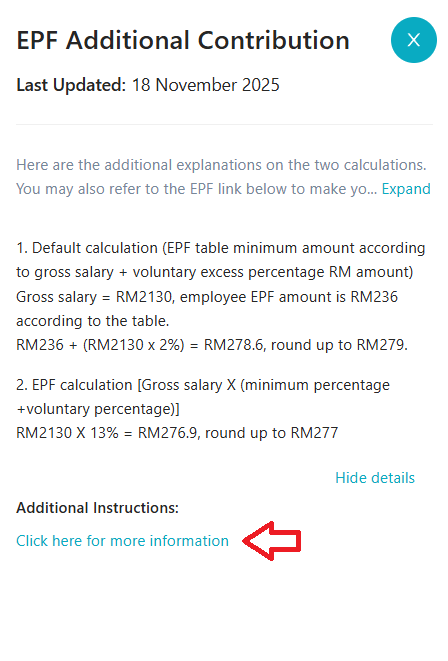
If there is an additional percentage that you are paying for EPF employer on top of 12% or 13%, key in the extra percentage here. Do note that it will be applicable to every employee. If you want to do it individually, go to that employee's profile and change it at compensation.

There are 2 ways of calculating EPF amount when there's additional contribution from employee and employer.
Both calculation methods are acceptable and it ultimately comes down to your preference. You can also click the help tool to view more details on the calculations, including the official calculation from EPF:

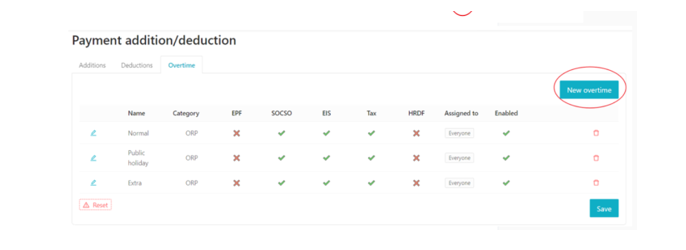
Here is where you can set the Overtime rates. You can edit the preset OT rates, and also create new OT rates by go to payroll calculator settings > New Overtime

a) The formula for calculating OT amount in our system:
Salary/OT working days in a month/standard working hours = 1 hour rate.
1 hour rate x OT rate x hours worked = OT amount.
RM5000/26/8 = 24.04.
RM24.04 x 2.0 x 20 = RM961.6
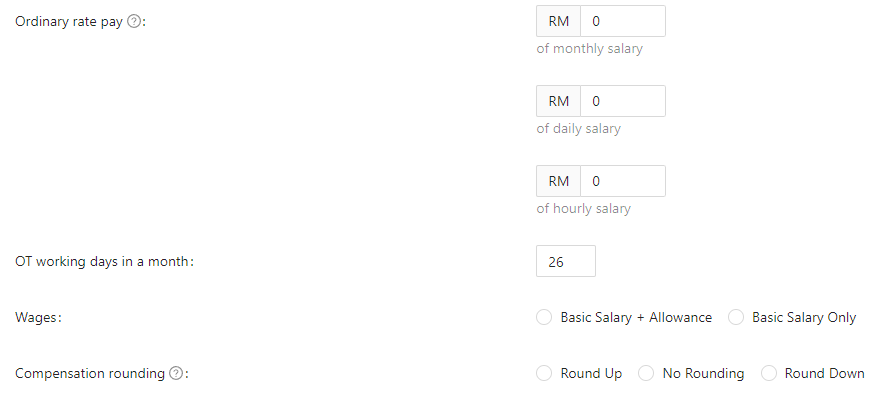
b) Ordinary rate pay is the amount used to calculate OT amount.
- For monthly, if employee's salary is RM5000 and RM3000 has been keyed in here, RM3000 will be used instead of RM5000 to calculate the employee's OT amount, for example, RM3000/26/8 x OT rate x OT hours = OT amount.
- For daily, if each day, employee is being paid RM200 and RM100 has been keyed in here, RM100 will be used to calculate the employee's OT amount, for example, RM100/8 X OT rate X OT hours = OT amount.
- For hourly, if each hour, employee is being paid RM20 and RM10 has been keyed in here, RM10 will be used to calculate the employee's OT amount, for example, RM10 X OT rate X OT hours = OT amount.
Leave the amount as RM0 if it should use the original amount to calculate the OT amount.
c) OT working days in a month is for you to set how many days will it be divided by in OT calculation.
d) Wages allows you to choose if you wish to include Allowance(s) as part of OT calculation.
e) Compensation rounding allows you to Round up, Round down, or No rounding after the OT amount is calculated.
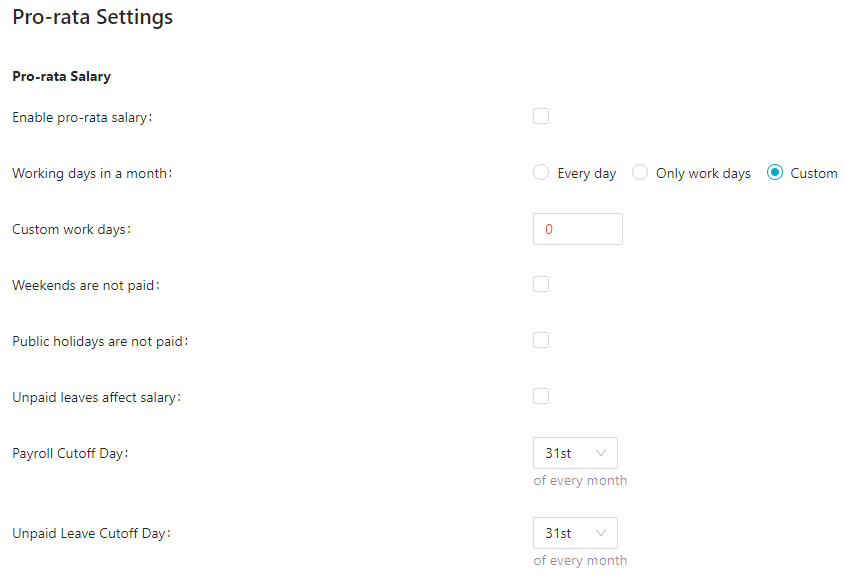
Pro-rata salary will be applicable to i) newly joined employees, ii) terminated employees and iii) employees with unpaid leaves.
a) The formula for calculating pro-rated salary:
Salary/working days in a month = day rate. Day rate x number of days worked in a month = Final amount.
i. Number of days worked in a month for newly joined employee would be calculating from the start date of the employee in the month until end of the month.
ii. Number of days worked in a month for terminated employees would be calculating from the start of the month until the termination date.
iii. Number of days worked in a month for employees with unpaid leaves would be calculating the total amount of days worked in a month and deduct the number of unpaid leaves days.
RM2500/26 days = RM96.15. RM96.15 x 15 = RM1442.25.
Turn it on if it is applicable to one of the 3 groups of employees and choose the different options for the system to pro-rate the salary. Do note that for unpaid leave cutoff day, it is based on the date of submission.
Unpaid leaves affect salary in Pro-rata Salary
a) There is no unpaid leaves in our system and it has to be created manually. Go to Leave Settings and click Add Leave Type.

How to create an unpaid leave type?
b) Now, after employees' unpaid leave(s) have been approved, it would be deducted from their salary.
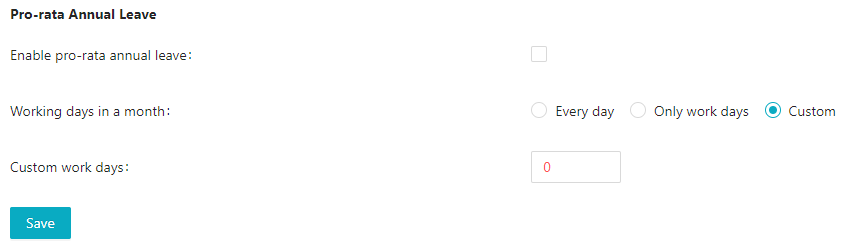
If you wish to pro-rate employees' annual leave upon termination and convert the pro-rated annual leaves into their salary, tick Enable pro-rata annual leave.
Set the Working days in a month and go to employee's profile and click Terminate Employee.

Go to the employee's payroll and click Calculate to recalculate the payroll. Click at How is this calculated to check the calculation.


We have 3 different payslip formats, 2 A4 sized, 1 with YTD and 1 without and A5 sized. Only the payslips that are A4 sized has a logo. Go to Company settings > Logo to upload it.
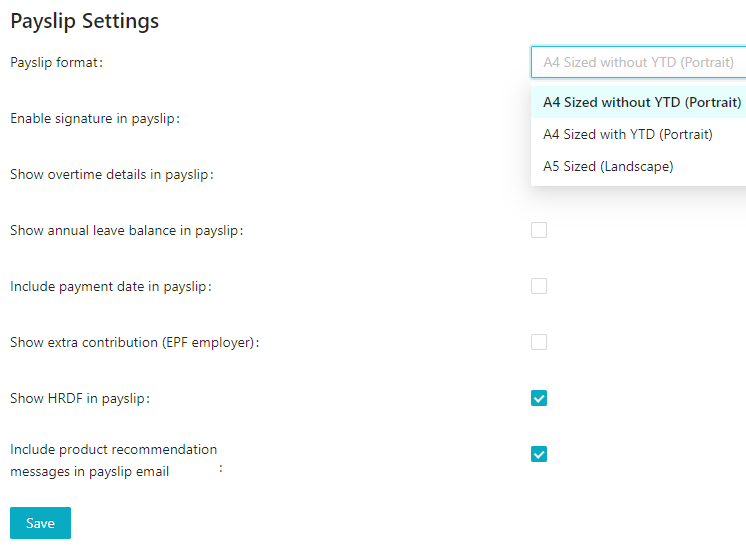
You can customize the details to be included in the payslip by checking and unchecking them.
Payroll calculator
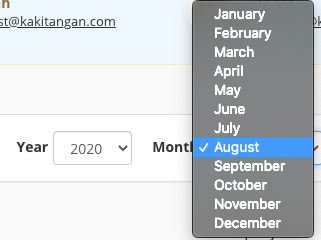
- Go to Payroll, and scroll down. The first part is for you to select the payroll Year and also the Month that you are trying to browse. By default, it will show the month according to the current date.
- On the left, you can view the number of employees that you have and on the right, you can select the employee's name to browse his/her payroll. You can type to search for a name as well.
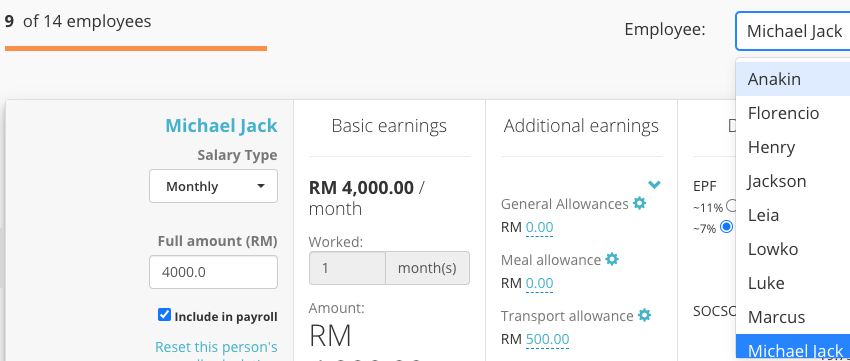
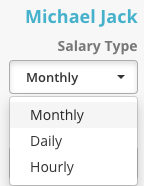
- Salary type is for you to select Monthly, Daily, and Hourly.
- After you have selected the salary type, key in the basic salary or the rate that the employee will be paid with.
- If there are employees that are not supposed to be included in payroll, untick Include in payroll and the employee will not show up in the report.

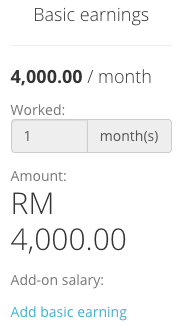
- After you have keyed in the basic salary and click calculate, it will appear under Basic earnings. Use Add basic earning, to add other forms of earnings.
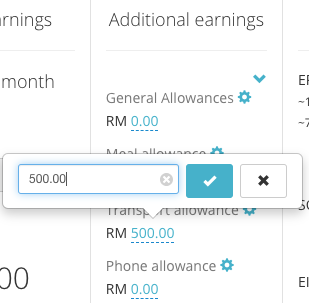
Additional earnings
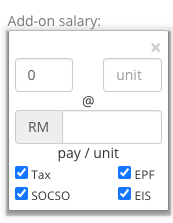
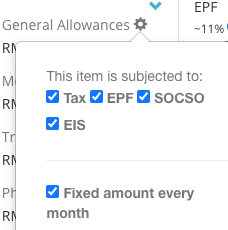
- Key in allowances here
- Click at the settings button to choose does the allowance subject to statutories. By default, these settings have been preset according to labor law. If you wish to change it, you can untick it. If the allowance is fixed for every month, tick Fixed amount every month and you don't have to key in the amount again for next month.
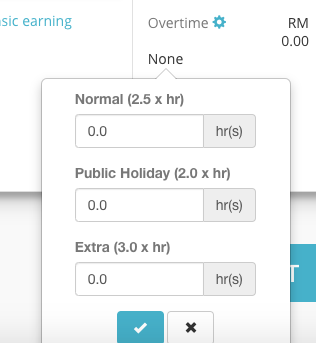
- Under Additional earnings, overtime is located there as well, click None to key in the hours worked.
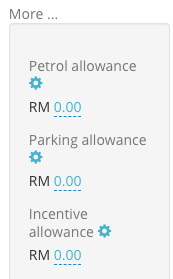
- If you are not able to find the allowances that you want, click More at the bottom of Additional Earnings to find more allowances.
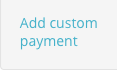
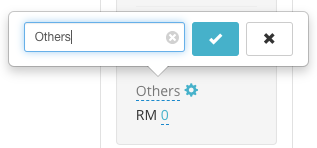
- If you wish to create your own allowances, click Add custom payment, rename Others to the name of the allowance and key in the amount.
Pro-rate fixed allowance
If you would like to pro-rate your fixed allowance based on the number of worked days,
you may go to Additional earnings > setting > edit > select the fixed allowance to edit > checked "pro-rated" > ok > save.
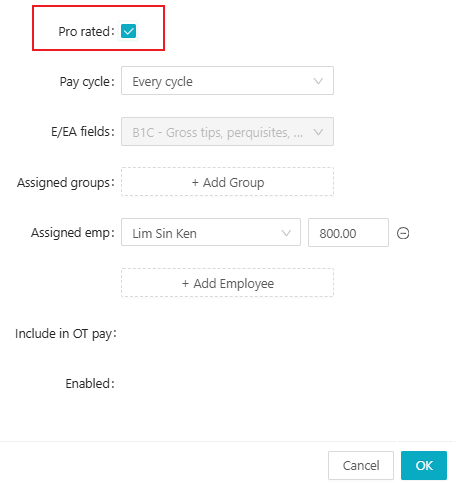
Calculation will be based on [Allowance/ Working Days in Month] x Total working days]
Please note that this features will only affect the employee who is not fully service for the month, which is new joiner, employee who on unpaid leave or terminated employee.
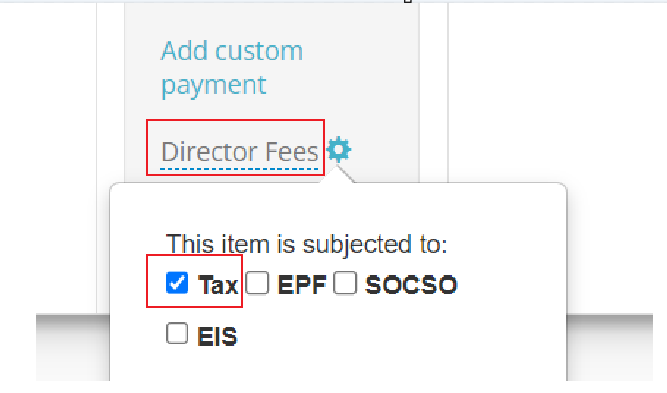
Director Fees
Please bare in mind that Director Fees is not subject to EPF but is mandatory subject to monthly tax deduction (MTD).
Thus, if you want to add "Director Fees" in the payroll,
you may go to Additional earnings > Add custom payment > name it as Director Fees > checked 'tax" > calculate your payroll to see the result.
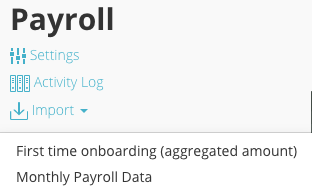
- Another way to import key in the allowances and salary is via Payroll > Import > Monthly Payroll Data.
- In this page, click Download Template,
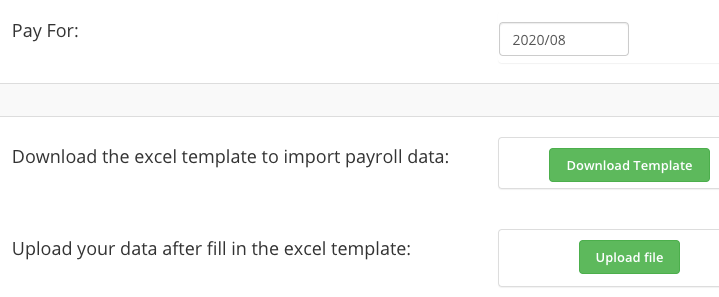
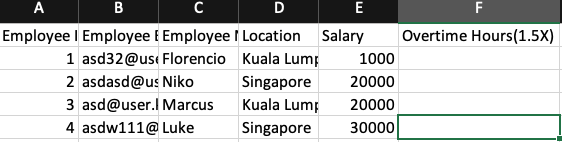
- the downloaded file will be in this format. Key in the OT worked hours and different allowances (do note there are limited allowances here and customed allowances will not be recognized upon uploading),
and click Upload file to import the data into the payroll calculator. For a more detailed guide, please refer to this link: Can I use excel to import into payroll?
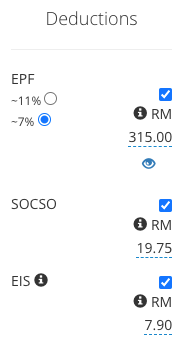
Deductions
- For EPF, SOCSO, and EIS deduction, the calculation is according to the table provided by the government.
- For income tax, there are 2 calculations available in our system, both are approved by LHDN. If you tick both boxes as the image, it will be using table-based calculation; if you untick the box on the left, it will be using formula based calculation.
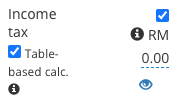
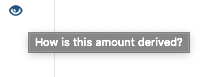
- If you wish to check on the calculation, you may click on the eye button and it will lead you to a page to show you the calculations.
- Here are the other deductions available, use Add deduction to create a custom deduction.
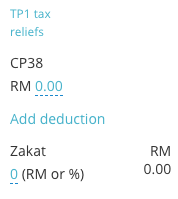
Example : Advance salary
Go to Add deduction > click SETTINGS to expand the item > check all of the statutory deduction > calculate payroll to see the result

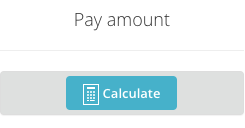
- Calculate is a very important step in payroll calculator as it RECALCULATE and save the latest changes that you've updated.
- After you have finished calculating, click View Report to check on the final report.

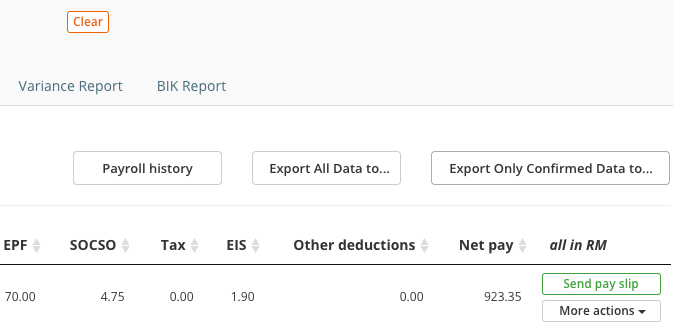
Payroll Report
- After you have clicked View Report, under Payroll Summary Report,

- check if all the amount stated here is correct. Once it is correct, click Confirm amount

- and select the date.
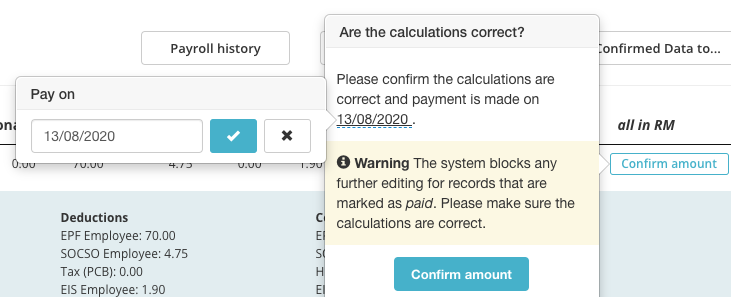
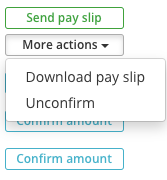
- Once you have finished the steps above, the Confirm amount status will be changed to Send payslip and More actions. If you would like to check the payslip, download the payslip first and once it is correct, click Send payslip. If there are details that are incorrect, click Unconfirm and go back to payroll calculator to make the amendments.
Make sure to Confirm amount after you have finalized the payroll every month, to indicate the closing of payroll and after Confirm amount, the info will be included in the EA form as well.
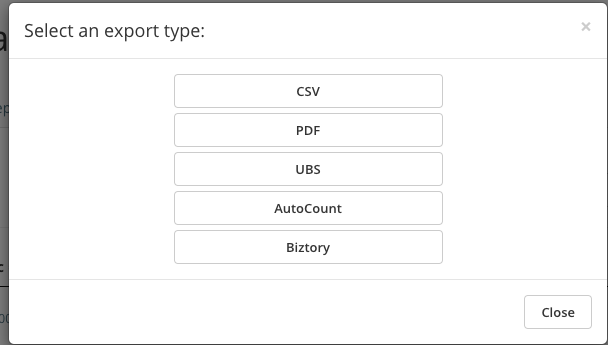
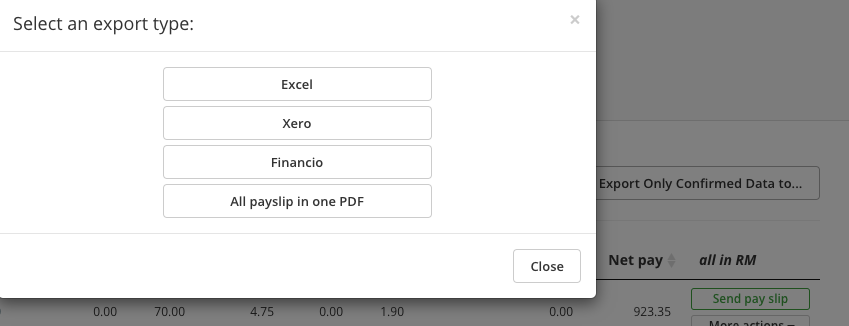
- In the same page, you can export the data out to excel/csv file or to other accounting softwares by using Export All Data to... and Export Only Confirmed Data to...
How to make Salary and Statutories Payment
-
In order to make payment of salary or statutories, there are 3 pre-requisites:
a) Fill up Company Registration Number in Company Settings.
b) Fill up all the information in company info in Payroll > Settings.
c) Confirm amount for all employees' payroll (if one employee's payroll is not confirmed, then his/her data will not be included in the payment). -
After filling up these 2 places, go to Payroll > View Report and scroll to the bottom of the page. Look for this:
-
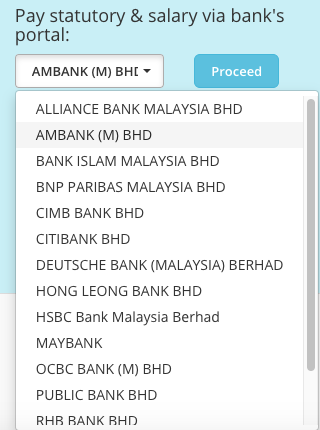
Here is where you can download the different banks' text files to make salary and statutories payment via their website. Do note that some banks have the text files for statutories payment and some do not have it.
-
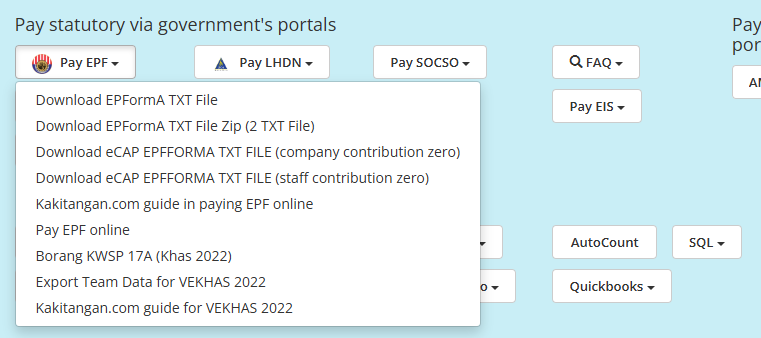
For banks that do not have the text files for statutories payment, use the function on the left to download the text files instead. There are user guides in each of the payment:
Payroll history
- There are 2 places to access payroll history:
a) At Payroll > History.
b) At Payroll > View Report > Payroll History.
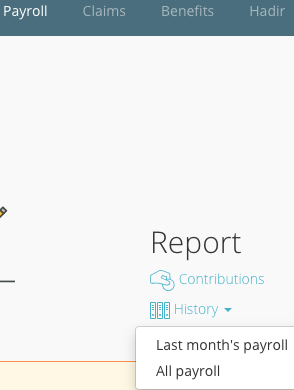
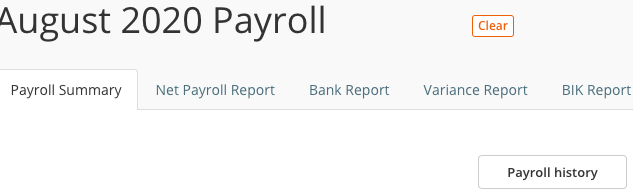
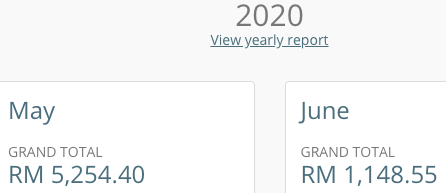
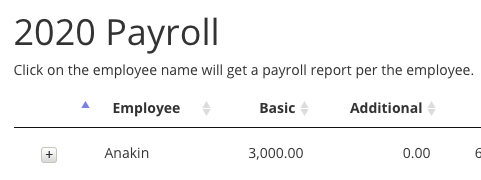
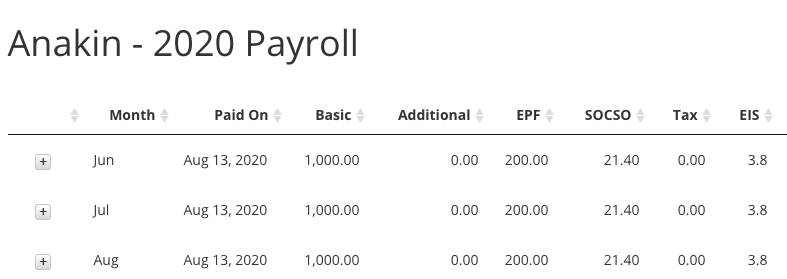
- In the Payroll History page, you can view all the payroll since the beginning when you first started using Kakitangan.com. Only the payroll that has been Confirm amount will be recorded here.
Use View Yearly Report to view the whole year's report,
and if you wish to have a breakdown report for a particular employee according to the month, click on the name of the employee.
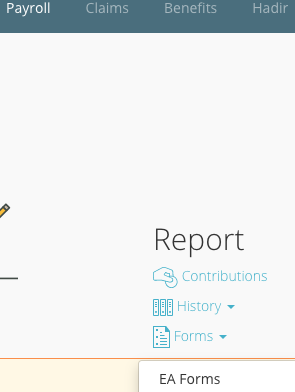
EA form
- To generate or view EA forms, go to Payroll > Forms and select EA forms.
- In this page, you can Download to check on the EA forms before clicking Send to email to send to employees.
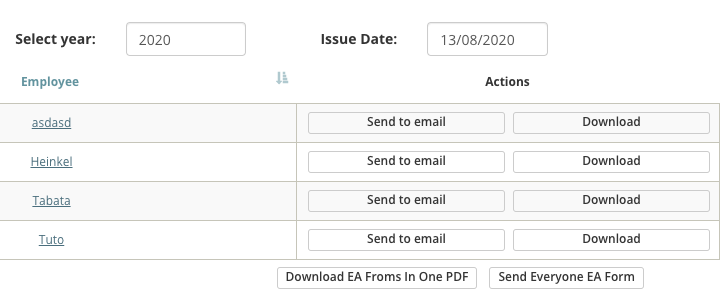
- EA forms data derives from:
a) Payroll that has been Confirm amount.
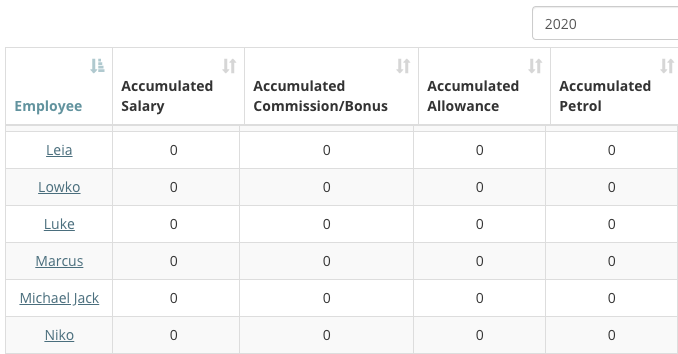
b) Payroll > Import > First-time onboarding (aggregated amount)

- In this page, fill up the accumulated amount up until 1 month before you start using Kakitangan.com, for example, you are planning to use Kakitangan.com starting July, fill up the accumulated amount from January until June in this page.
Two payroll cycles
If there are 2 payroll cycles for your company, for example, 15th is the paying of commission/bonus and 26th is the paying of salary, then this is for you.
- Go to Payroll > Settings > Multiple Cycles and select 2. You can choose whether to include the unpaid leave deduction and hadir attendances in 1st or 2nd cycle.
- Once you have turned on 2 cycles, if you go to payroll calculator, this is what you will see:
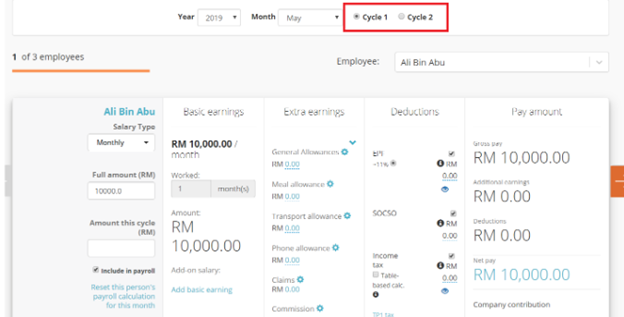
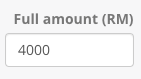
As per above:
a) Full amount (RM) : Key in the employee's basic salary and leave it as it is after that.
b) Amount this cycle : It is referring to the employee's basic salary for the current cycle. Only fill up this field for the cycle that you are making salary payment, for example, allowances to be paid in 1st cycle and basic salary in 2nd cycle.
-
In this case, insert RM0 into this box because you are not paying salary this cycle and insert the allowances amount in Additional Earnings. Click Calculate and system will generate the figure.
-
In 2nd cycle, insert this field with the basic salary amount since you are paying basic salary in 2nd cycle.
Do take note to Confirm amount in View Report page for 1st cycle first before proceed to key in details in cycle 2. Do not start with 2nd cycle first, it has to be in order.
Also, It is highly recommended to do bonus in 2nd cycle because bonus's calculation is slightly different than normal allowances.
Hope it helps!
 Kakitangan Blog