Hong Leong Bank Connect First API & Connect Biz User Guide
Connect First
If you do not have a Hong Leong Connect First account yet, may check out these 2 links:
https://www.hlb.com.my/en/business-banking/connect-biz/register-security-tips.html (If the link is not working, please copy and paste it in your browser)
https://www.hlb.com.my/HLBCF_userguide
If you have a Hong Leong Connect First account already, you may skip this step.
Stage 1 - First time on-boarding setup
Setting up your company in Kakitangan.com:
Step 1: At dashboard, go to company settings.
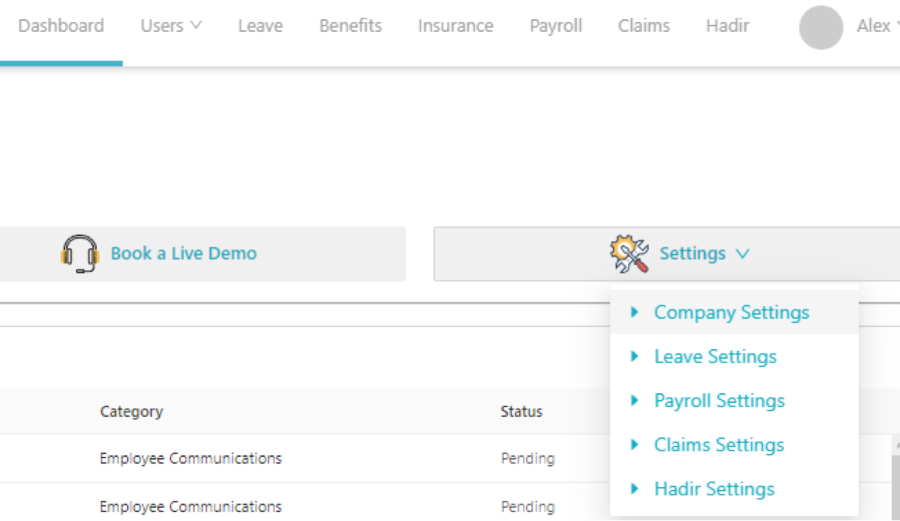
Step 2:
a) In company settings, fill in company name and company registration #
b) In Company Settings, go to Bank and Other Account Details.
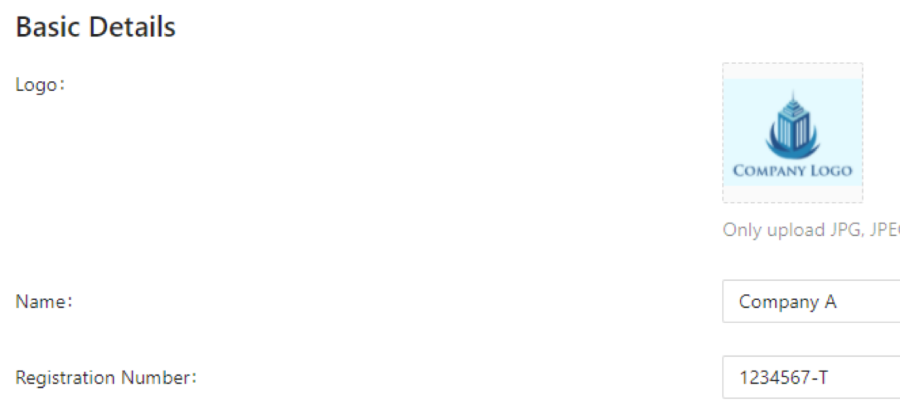
c) Fill up all the company info
Make sure that KWSP/SOSCO/LHDN Employer reference number is the same as Hong Leong Connect First reference number in order for the submission to be successful.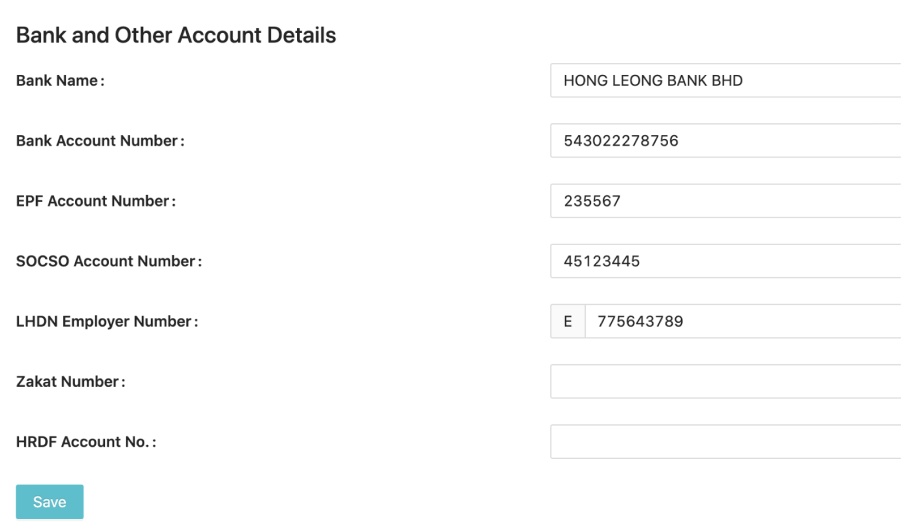
Step 3:
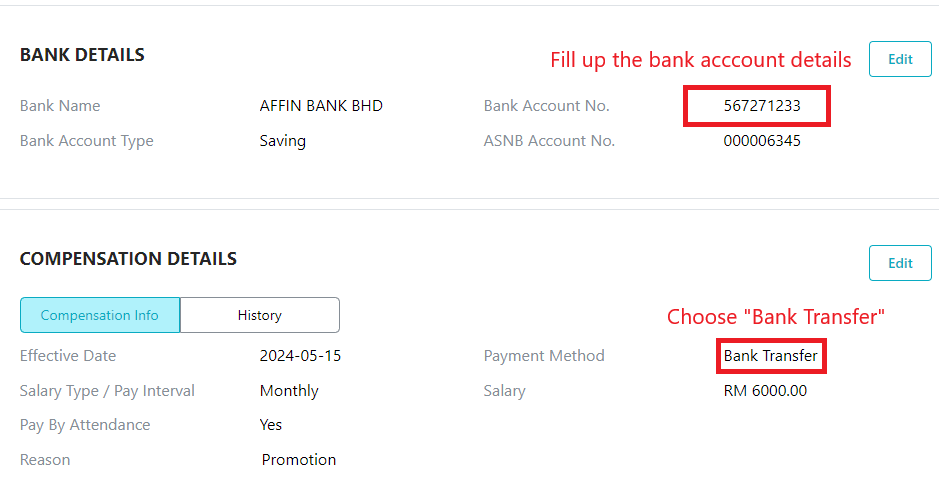
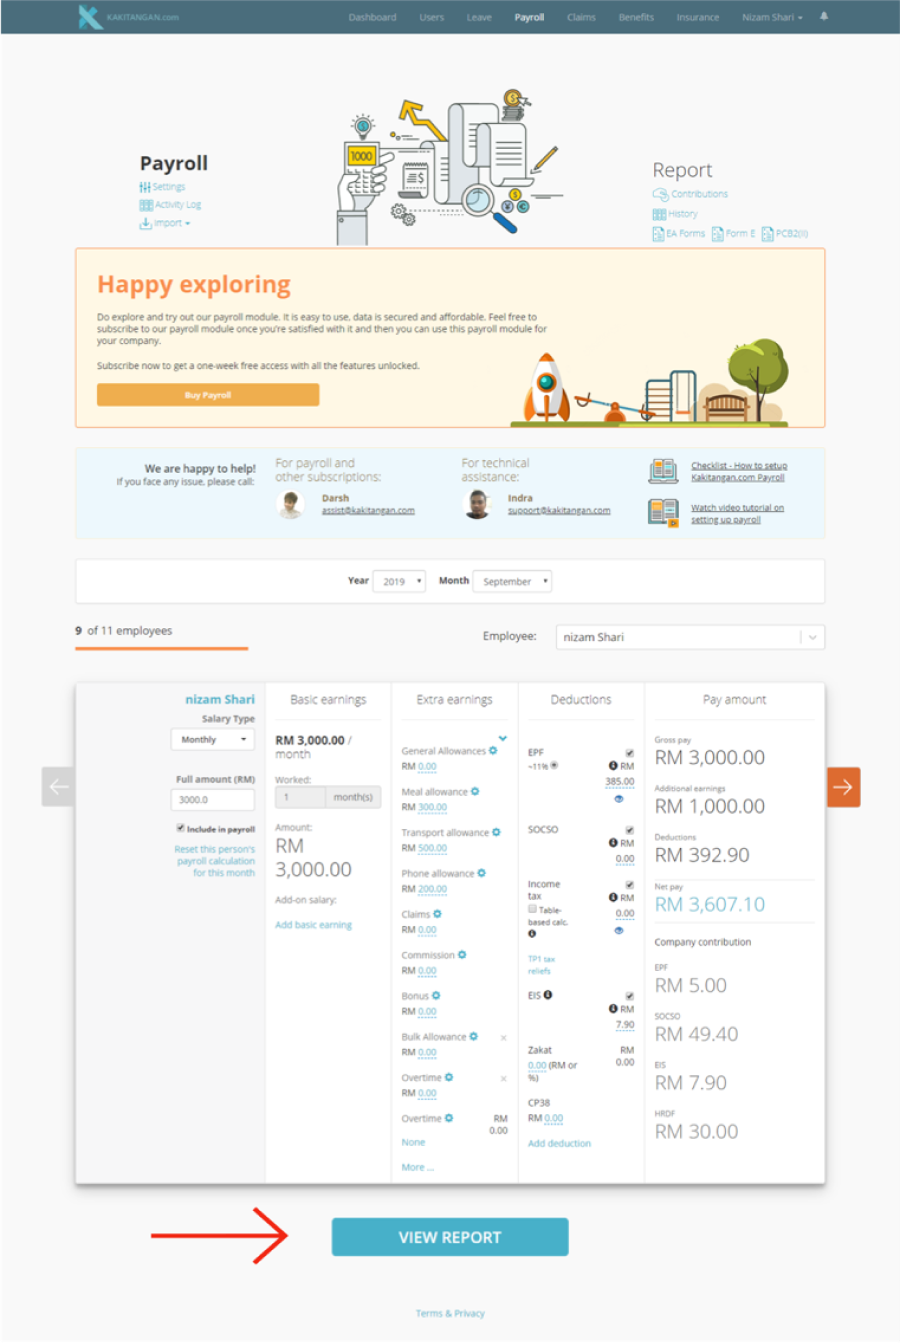
Make sure the employee details for bank account number is filled up and payment method is choose under ”Bank Transfer” under compensation.
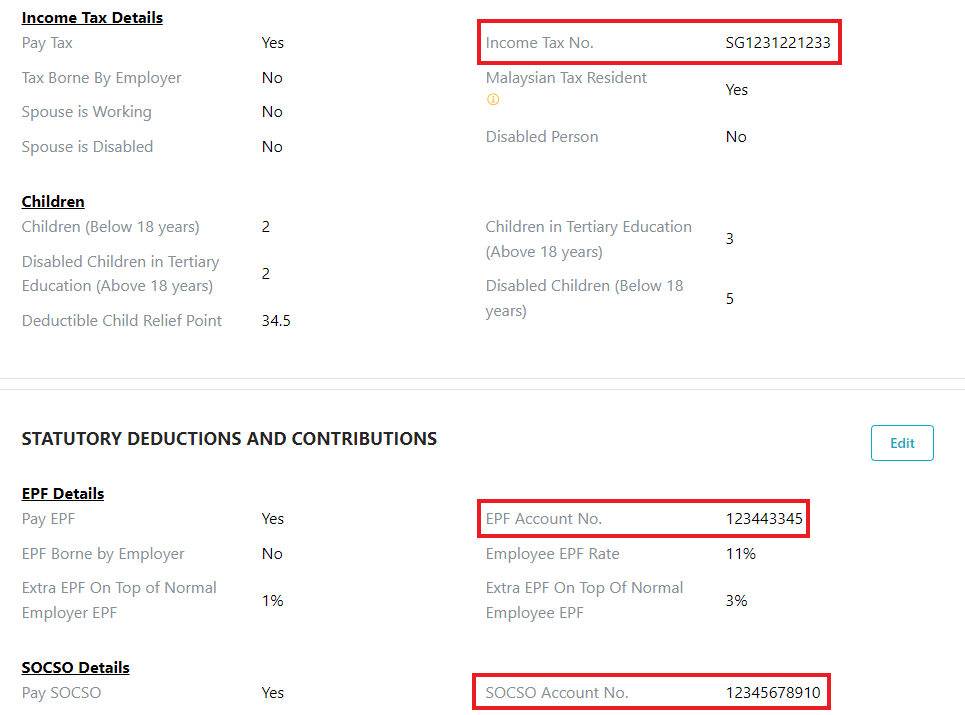
Filled up the information required for statutory payment
Step 4:
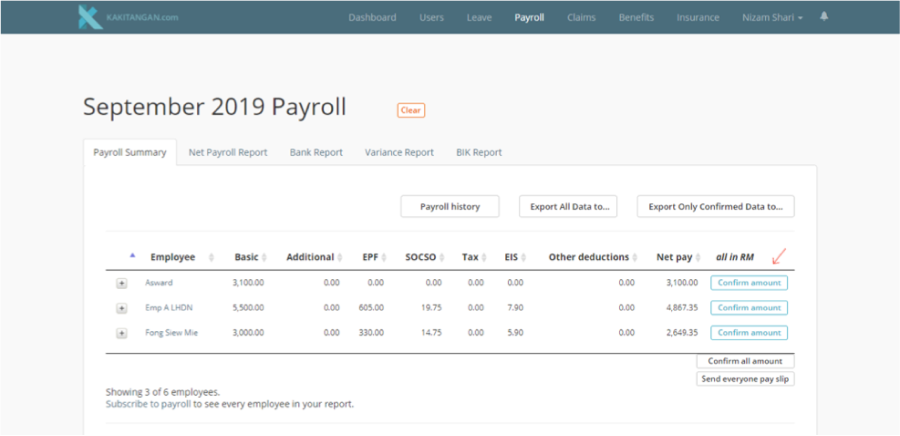
Check the calculation for all employees' payroll to ensure that it is correct. After that, click on view report.
Step 5:
In the payroll summary report click ‘confirm amount’ for all employees once all the details in payroll summary report are correct.
Step 6:
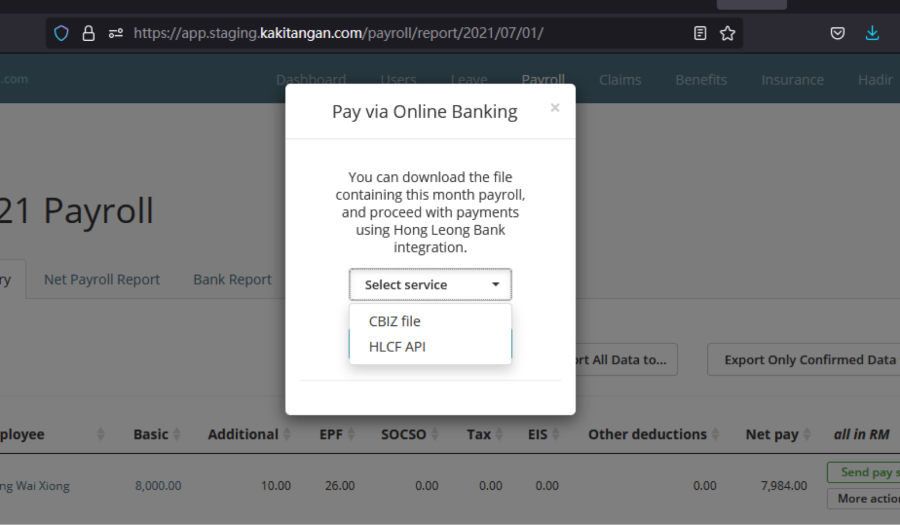
At the bottom of the page, at Pay statutory & salary via bank's portal, select Hong Leong Bank Bhd and click proceed.

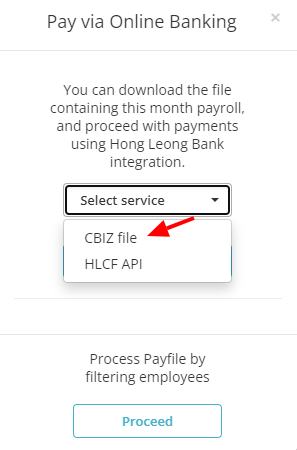
Step 7:
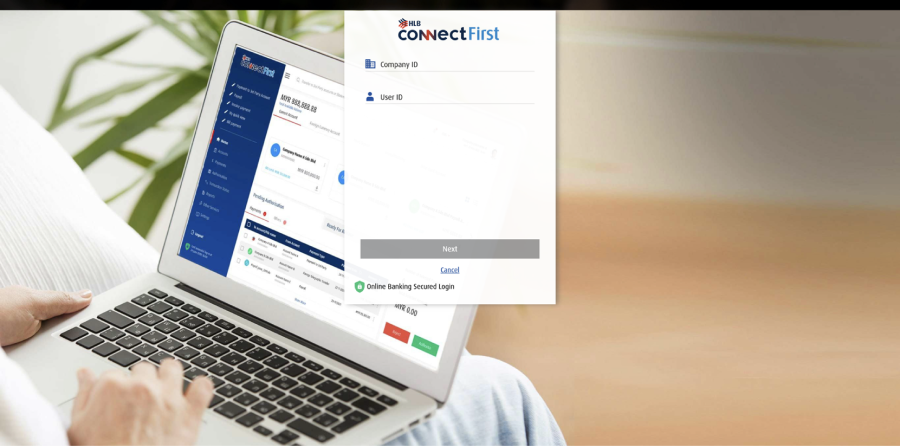
Select “HLCF API”
Step 8:
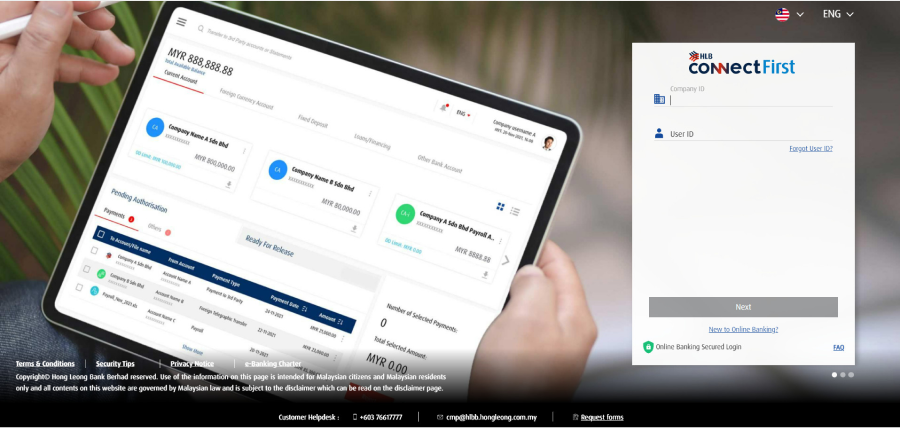
a) Click on “Connect to HLB”
Step 9:
a) Redirect to connect HLCF, login with credentials. Please do note
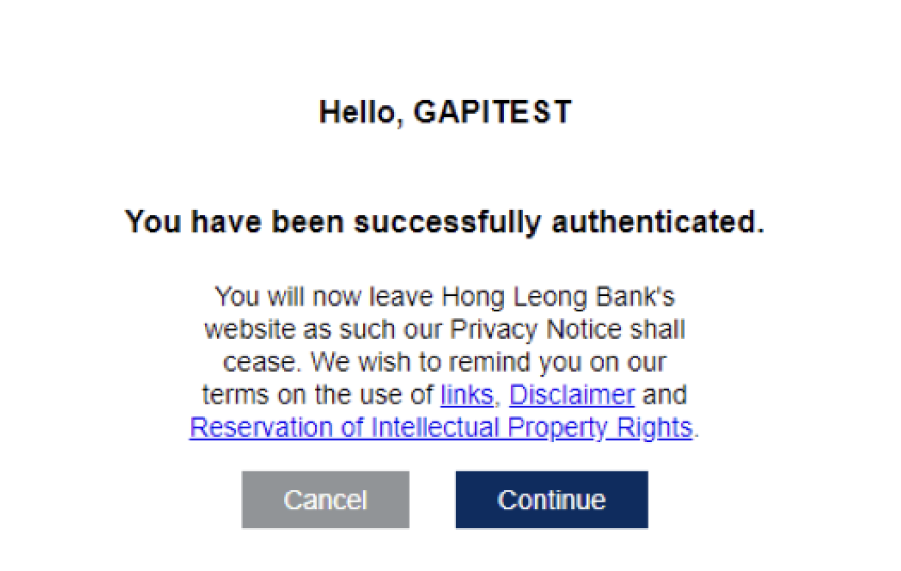
b) After Successfully login and authenticated, click ‘Continue’
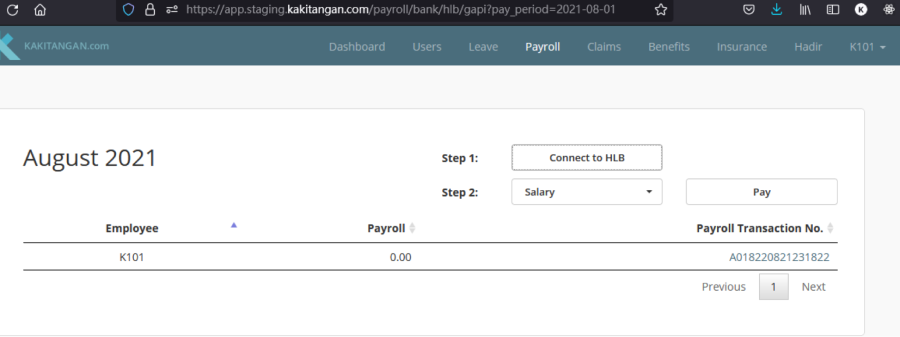
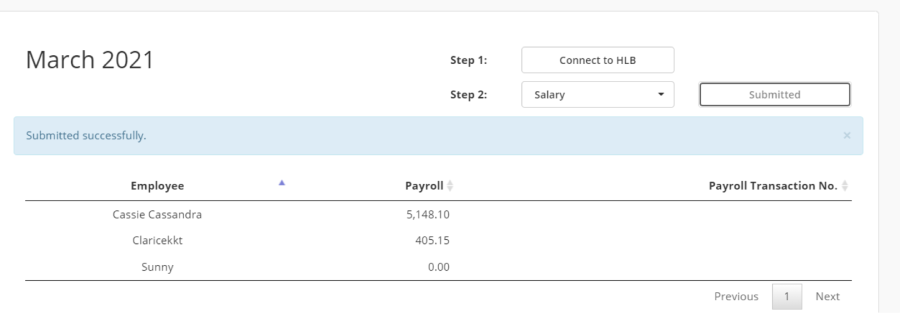
Step 10:
a) After Successfully connect, you may go back to the kakitangan tab and proceed to make payment on Salary/Statutory. Click on the box on step 2, and it will have a dropdown to select "Salary” or Other “Statutory” to pay
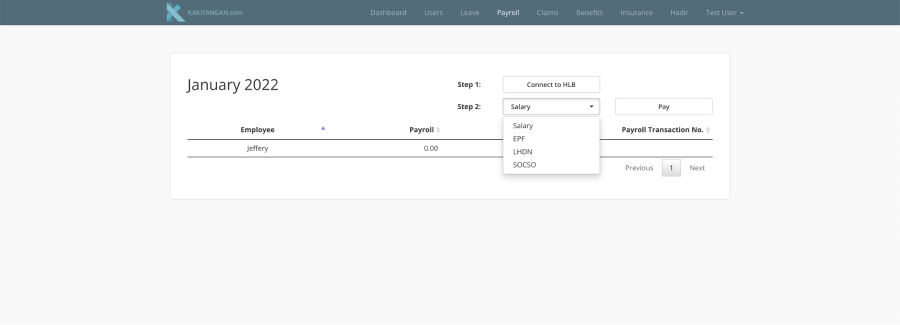
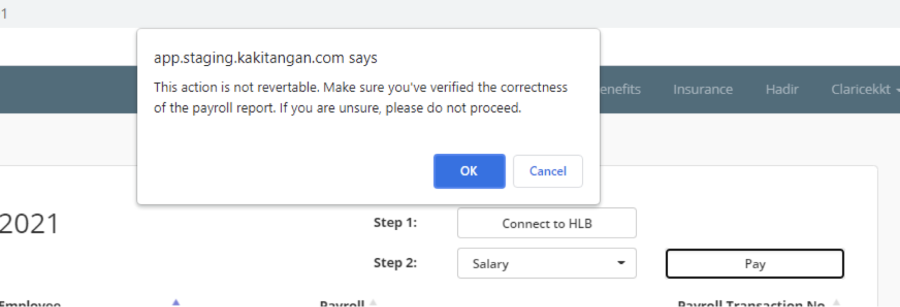
b) Click “Pay” for processing payment and a pop up will appear for verified
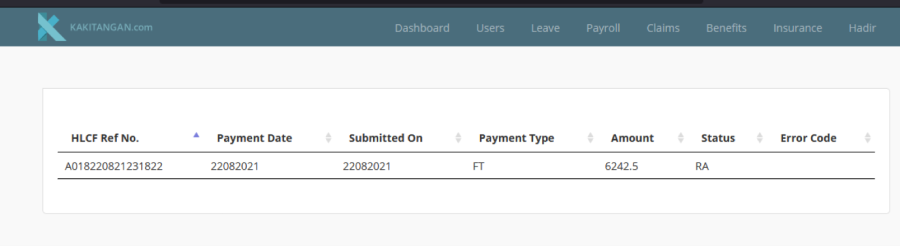
c) Refresh the page and the table will show the available transaction no. Click on the Payroll Transaction No, it will direct to transaction info page.
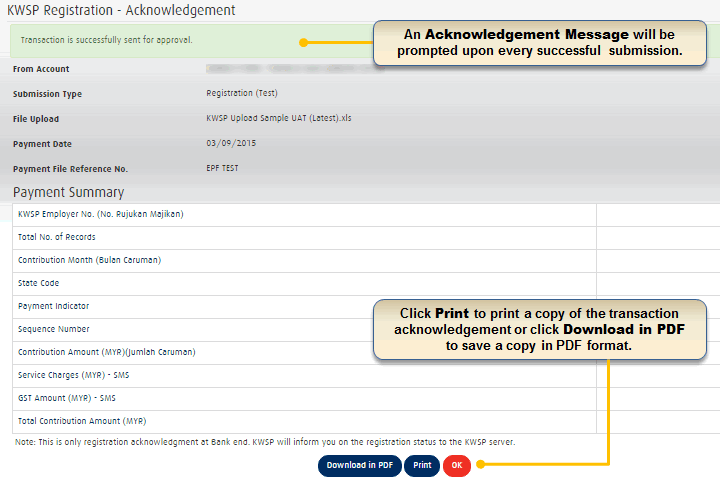
Stage 2 - How to Authorize Approval from HLB
Step 1:
HLB User to login into their Authorizer ID in the login page
Step 2:
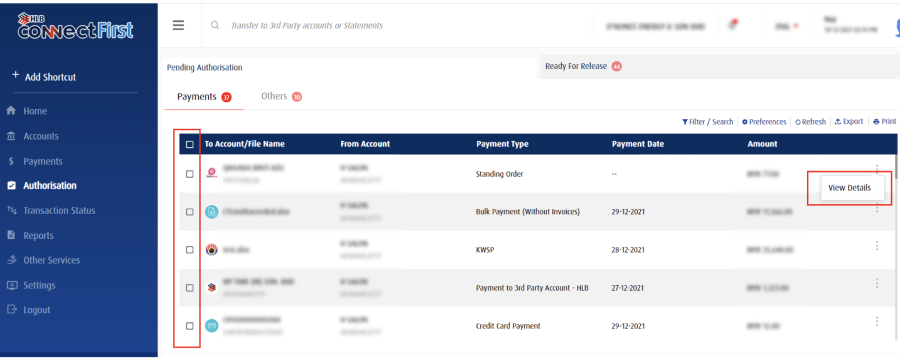
Once login > Navigate to the tab “Authorization” > You can find the transaction available for approval under the table Payments
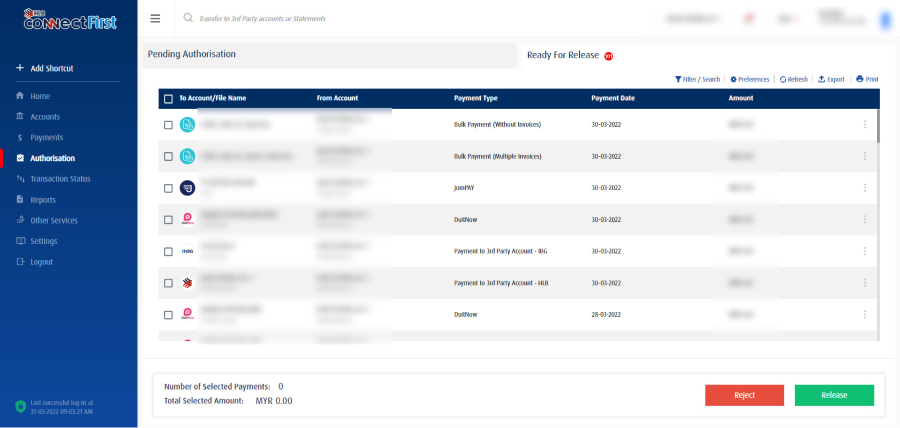
Step 3:
2 option to Authorize the transaction
Option A:
A) Tick on the small box on the left and click authorize
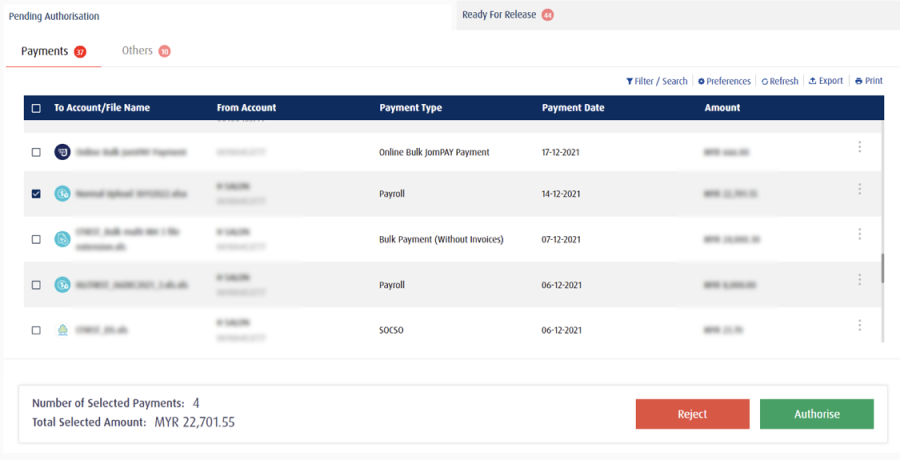
Option B:
B) Click the 3 small button on the right and view the details to confirm the transaction then authorize.

Step 4:
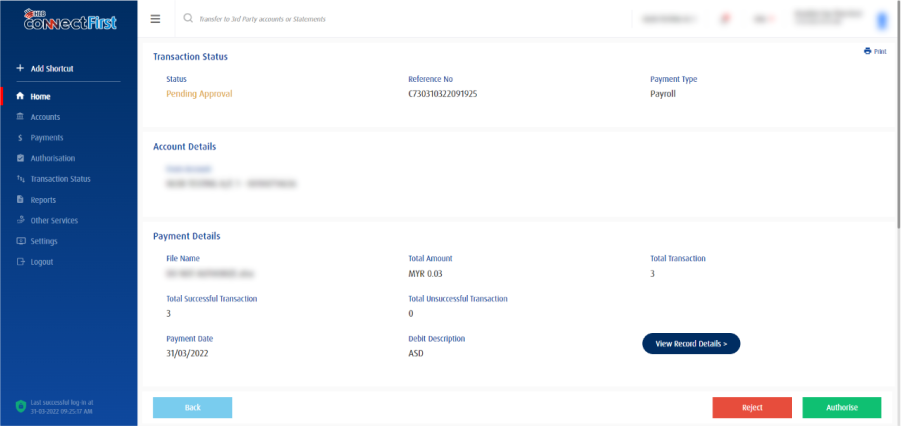
Once click on authorize it will prompt the screen for you to confirm the transaction and amount before confirming.
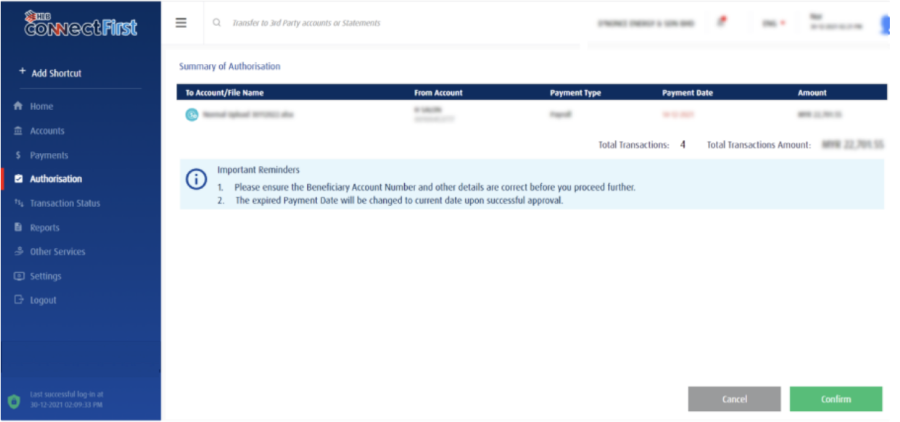
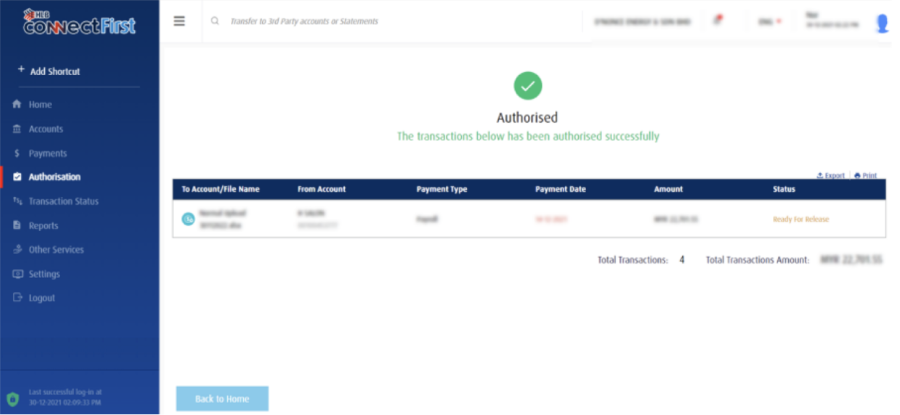
Step 5:
Once confirm it will direct you to this screen where inform you that you have successfully authorize the payment – those company
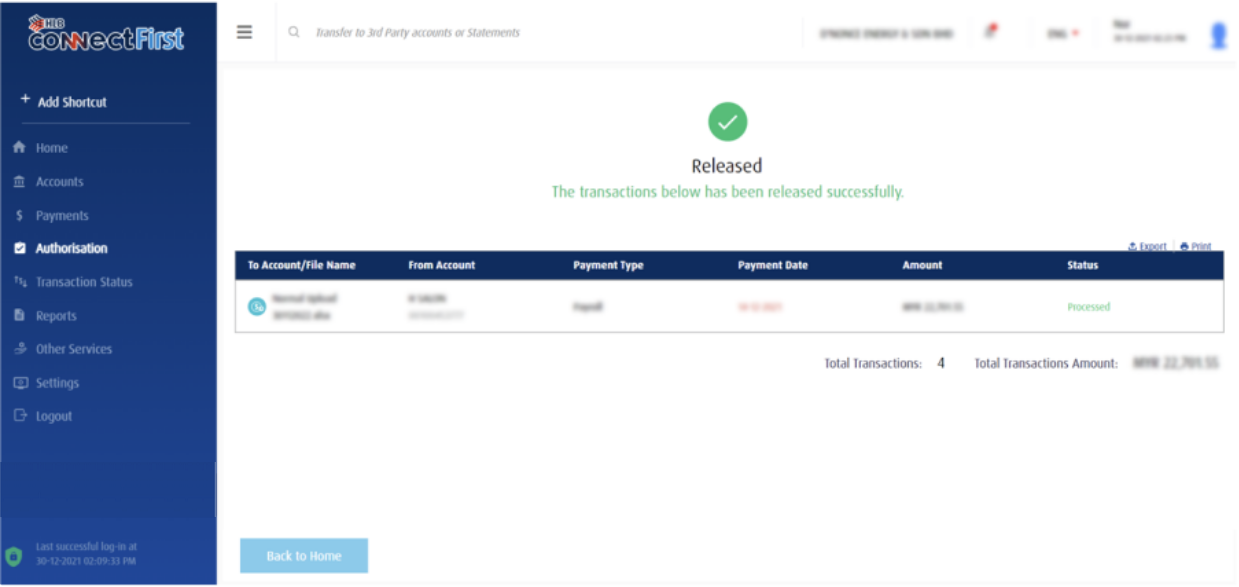
For further details in "Authorization", feel free to check https://www.hlb.com.my/HLBCF_userguide from page 27 onwards
Connect Biz
Setting up your company in Kakitangan.com:
Step 1: At dashboard, go to company settings.
Step 2:
a) In company settings, fill in company name and company registration #
b) In Company Settings, go to Bank and Other Account Details.
c) Fill up all the company info
Make sure that KWSP/SOSCO/LHDN Employer reference number is the same as Hong Leong Connect Biz reference number in order for the submission to be successful.Step 3:
Make sure the employee details for bank account number is filled up and payment method is choose under ”Bank Transfer” under compensation.
Filled up the information required for statutory payment
Step 4:
Check the calculation for all employees' payroll to ensure that it is correct. After that, click on view report.
Step 5:
In the payroll summary report click ‘confirm amount’ for all employees once all the details in payroll summary report are correct.
Step 6:
At the bottom of the page, at Pay statutory & salary via bank's portal, select Hong Leong Bank Bhd and click proceed.
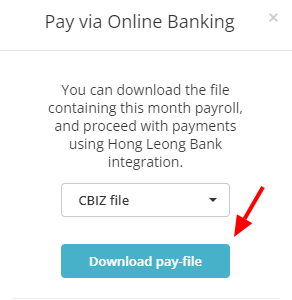
Step 7:
Select “CBIZ file”
Step 8:
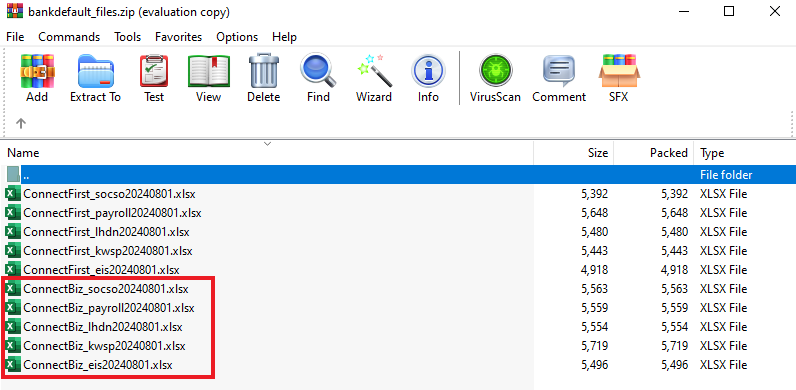
Download pay-file
In the downloaded file, there are Connect First and Connect Biz files, do make sure to use the Connect Biz files only:
Step 9:
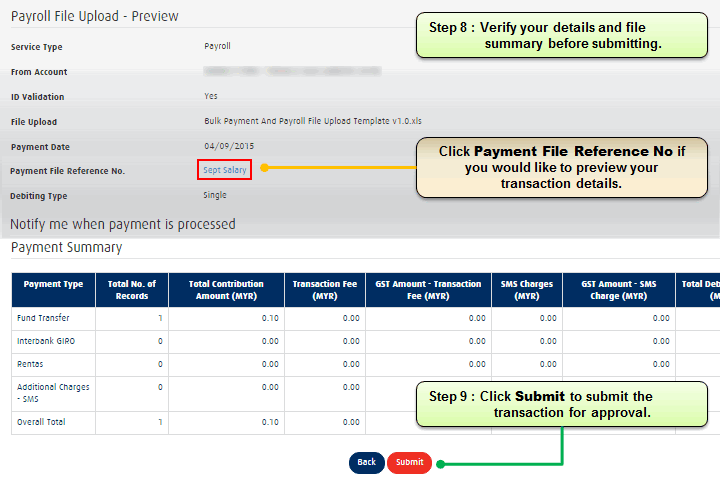
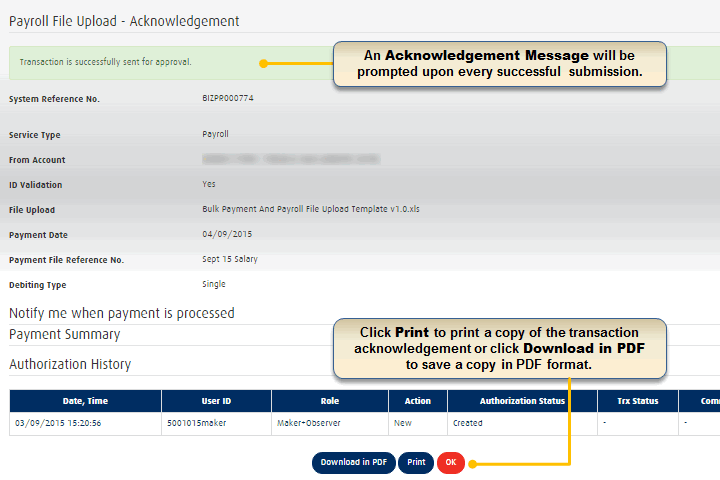
Salary payment
Log into Connect Biz in Hong Leong Bank and follow all the steps below:
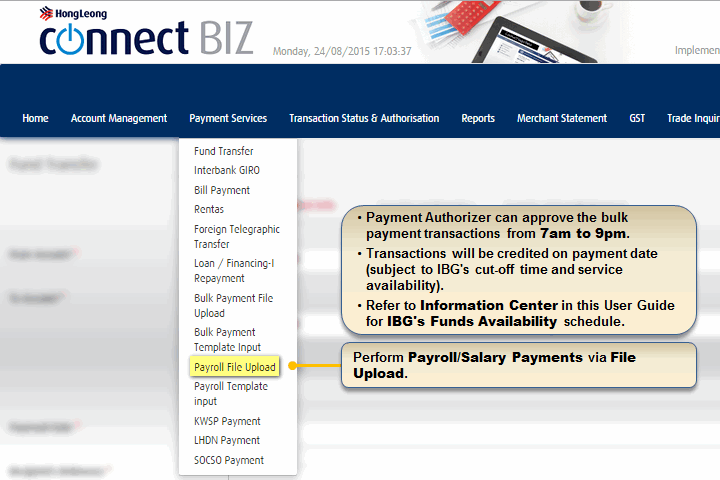
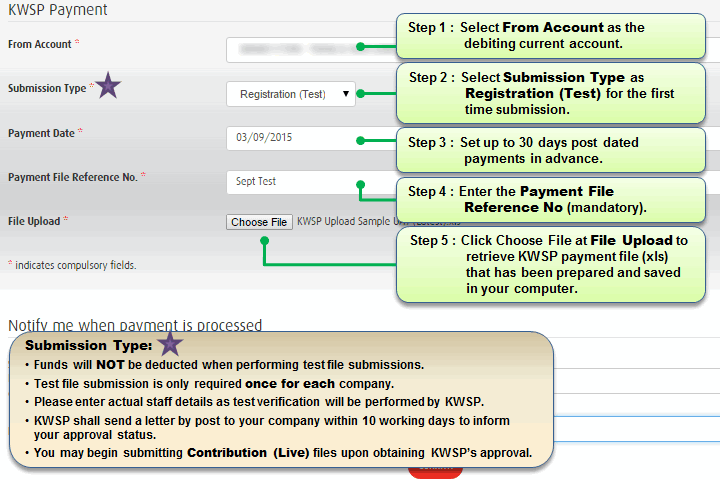
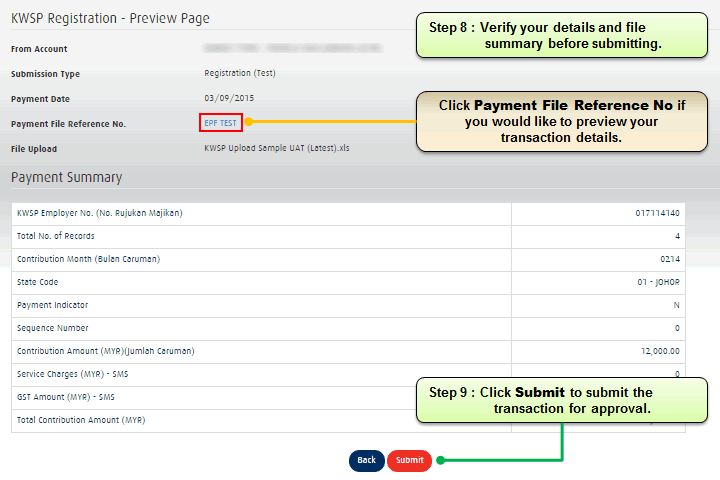
Statutory payment
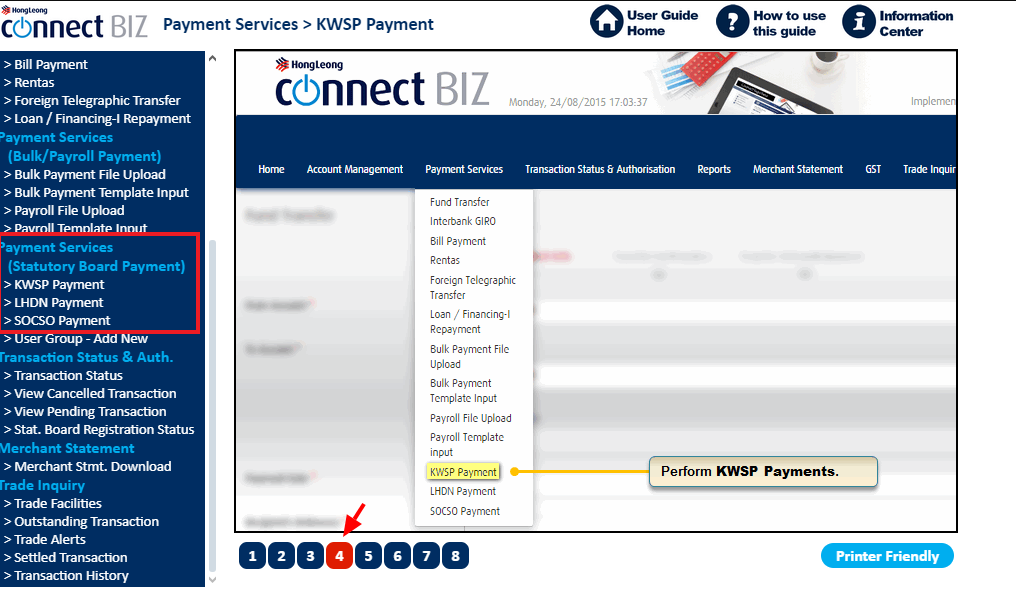
To make payments for KWSP, LHDN, and SOCSO, the access points in HLB are here:

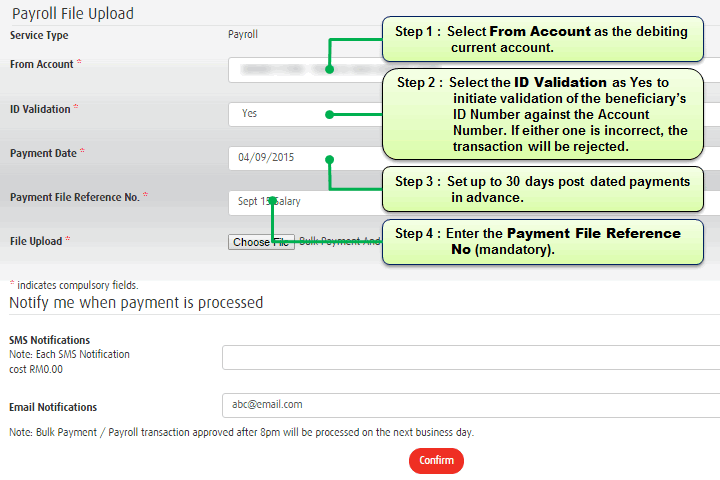
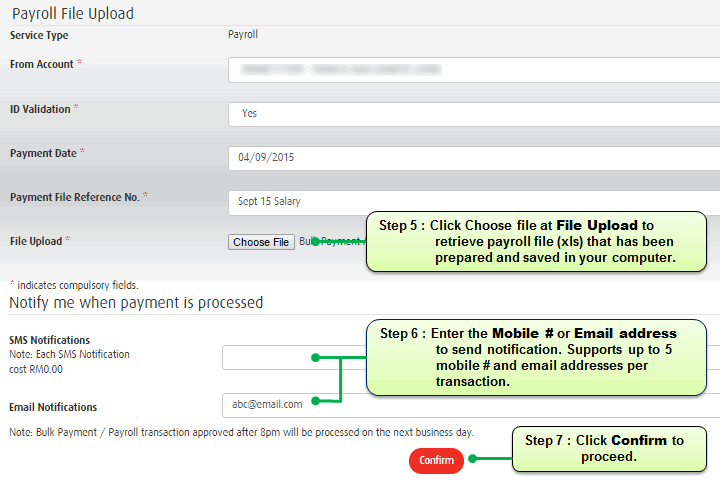
Follow these steps to upload the files downloaded from Kakitangan.com:

LHDN and SOCSO have similar steps as well and you may refer to this link for the userguide from page 4 onwards: