Setting Up Overtime Multiple Rate at Hadir Shift Scheduling
Calculating overtime (OT) pay correctly can be tricky, especially when your team works on public holidays, rest days, or off days at different rates. To make this easier, Kakitangan.com now lets you choose between Overtime Single Rate and Overtime Multiple Rate when setting up your shift scheduling.
Here's a step-by-step guide on how it works.
Step 1: Choose Your Overtime Rate Type
Head to your Shift Scheduling settings and scroll to the Overtime section. After enabling Allow overtime, you'll see two options:
- Overtime Single Rate – this works exactly the same as before.
Overtime pay type (e.g. Normal – 1.5x) and one PH overtime pay rate that applies across the board.
💡Note that with Single Rate, there are no separate rate configurations for Rest Day or Off Day, the same rate applies to all day types.
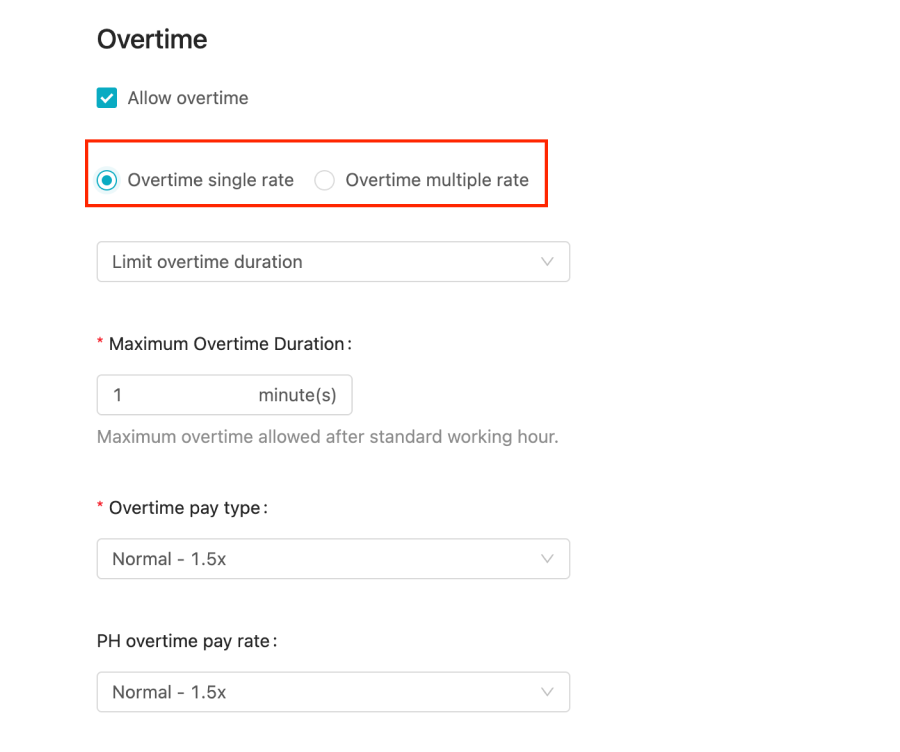
- Overtime Multiple Rate – this is the new option that lets you set different OT rates depending on the type of day and how many hours of OT were worked.

💡If your company's OT structure hasn't changed, you don't need to do anything differently, just keep Overtime Single Rate selected and your existing setup remains intact.
Step 2: Set Up Multiple Rate Overtime (If Applicable)
If you select Overtime Multiple Rate, you'll see a table broken down by Day Type:
- Working Day – OT rate for hours worked beyond normal working hours on a regular working day (8hrs and above).
- Public Holiday – OT rates for 0–4hrs, 4–8hrs, and 8hrs and above.
- Off Day – OT rates for 0–4hrs, 4–8hrs, and 8hrs and above.
- Rest Day – OT rates for 0–4hrs, 4–8hrs, and 8hrs and above.
For each duration bracket, you'll choose which OT pay type should apply (for example, "Off day (Basic) – 0.5x" for the first 4 hours, "Off day (Standard) – 1x" for the next 4 hours, and "Off day (Extra) – 2x" for anything beyond 8 hours).
This gives you full flexibility to mirror your company's actual OT policy instead of applying one flat rate to everything.
Step 3: Configure Your Overtime Pay Types
Before you can select these new rates in your shift scheduling settings, they need to exist as Overtime pay types. Here's where to set them up:
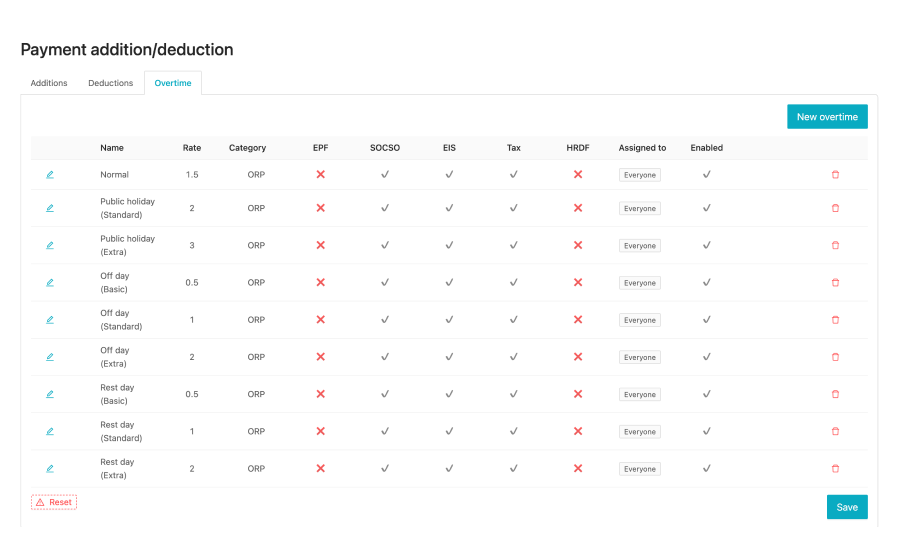
Go to Payroll Calculator > Add New Payment > Overtime. You'll find a list of OT types
- Normal
- Public holiday (Standard) and Public holiday (Extra)
- Off day (Basic), Off day (Standard), and Off day (Extra)
- Rest day (Basic), Rest day (Standard), and Rest day (Extra)
For each type, you can review and adjust:
- Rate (e.g. 0.5x, 1x, 1.5x, 2x, 3x)
- Category (ORP)
- Whether it's subject to EPF, SOCSO, EIS, Tax, or HRDF
- Who it's assigned to (e.g. Everyone, or specific employees/groups)
- Whether it's enabled
You can also click New overtime to create a custom OT pay type if your company needs something beyond the default options. Once these are configured, they'll be available for selection in the Overtime Multiple Rate table from Step 2.
💡 Need a refresher on managing additions, deductions, and overtime? Check out our full guide: New Way to Manage Additional Earnings, Deductions, and Overtime
Step 4: Assign Off Day and Rest Day to Employees
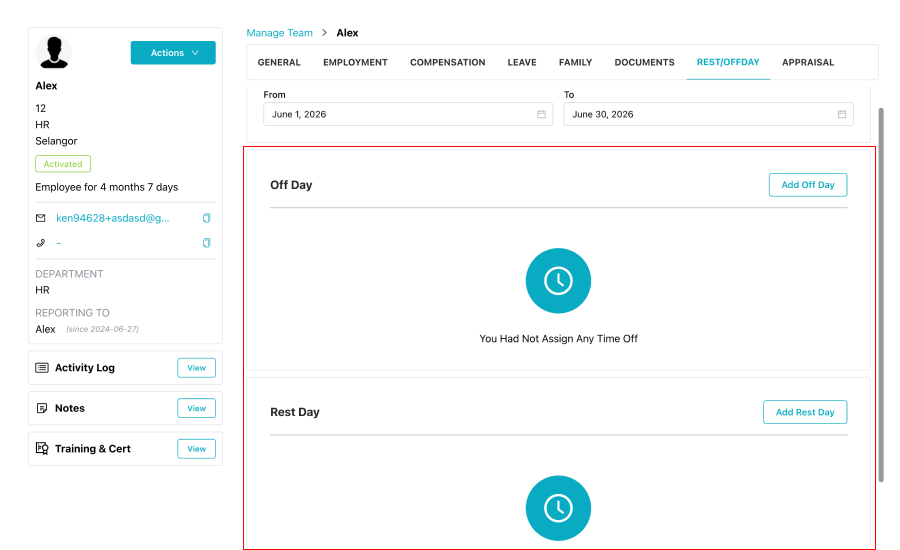
Off Day and Rest Day OT rates only apply correctly if the system knows which days are an employee's actual off days or rest days. To set this:
- Go to Manage Team and select the employee.
- Click on the Rest/Offday tab.
- Choose your From and To date range.
- Use Add Off Day or Add Rest Day to mark the relevant dates for that employee.
Once these are assigned, any approved OT worked on those dates will automatically be calculated using the corresponding Off Day or Rest Day OT rates you set up in Step 3.
With these settings in place, it will automatically apply the correct OT rate based on the day type and number of hours worked. If you have any questions about setting this up for your company, feel free to reach out to our support team.